Program Backup Utility
Desktop · Written guide Content date 3 min read
On this page
In Tax Processors Plus Desktop, the Program Backup Utility is used to make a complete backup of the entire Tax Processors Plus Desktop folder to a secondary drive, such as a thumb drive or external hard drive, as well as restore the entire folder. This includes all years along with their associated returns and attached images and PDFs. Thus, this backup could take some time to complete and is generally not run during the workday but afterwards.
The Program Backup Utility is also used to restore the Tax Processors Plus Desktop folder. If you are restoring the Tax Processors Plus Desktop folder from the backup, be aware that any existing data will be overwritten.
If you are using Tax Processors Plus Desktop in a networked environment, this backup must be run on the computer designated as the File Server. Running it on a Workstation computer won't save return data since the returns are stored on the File Server.
Caveats
- When you invoke the Program Backup Utility, Tax Processors Plus Desktop quits, so don't select it in the menu until you are ready to use it.
- To avoid errors, don't work in any year of Tax Processors Plus Desktop during the backup.
Check the drive to ensure it's big enough
Before backing up, it's a good idea to be sure that the drive you are backing up to has enough free space to accommodate the backup. Here's how to see how much space you need:
- Open a Windows File Explorer window. One way to do this is to right-click the Start menu and choose "File Explorer". Or, you can click the manila folder icon in the Windows taskbar.
- Choose This PC in the left column and navigate to the drive Tax Processors Plus Desktop is installed on (typically the C drive).
- Right-click the Tax Processors Plus Desktop folder and choose Properties.
- Note the amount listed for Size on disk. This is the size of the data that will be backed up.
If you have an existing drive for backup purposes but aren't sure if it's got enough room, insert it and follow these instructions to find out if it's big enough:
- Plug the backup drive into the PC.
- Open a Windows File Explorer window and in the left column click This PC (or your PC's name if it's different) to show the list of "Devices and drives" on the PC.
- Right-click the backup drive and choose Properties.
- Note the amount of free space.
If the size of the Tax Processors Plus Desktop folder is greater than the free space on the storage device, you'll need to either free up some additional space on the device or use a different device.
Backing up
When you're ready to back up, plug the backup drive into the PC and note the drive letter that Windows assigns to the drive. Then, from the Quick Menu of Tax Processors Plus Desktop select:
- Utilities
-
Program Backup Utility - At this point Tax Processors Plus Desktop will quit and the Program Backup/Restore Utility will begin:
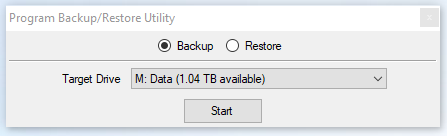
- Select the Target Drive (in this example, drive M), then click Start.
- When the backup is complete, click OK and close the utility.
- In a Windows File Explorer window, in the left menu click your PC.
- Right-click the backup drive and choose "Eject". When Windows tells you it's okay to remove the drive, remove it and store it safely.
Restoring
If you need to restore the Tax Processors Plus Desktop folder in whole or in part to a new C drive or new PC, call our Pro support staff to arrange an appointment with one of our tech support specialists at (855) 698-0691.
Additional Information: